
How to add a chat to your website in 5 easy steps


Try Trengo for Free

Trengo unites WhatsApp, email, web, social media, and calls in one inbox, saving your team hours of repetitive work and ensures no conversation is ever lost

With Trengo, you can create your own bot without having to use code. In this blog, I will take you through the steps to make your first bot and integrate a bot on your website.
What is a bot?
First things first. We have all heard of a bot before, but what is it exactly and how does it work?
A bot is a scripted AI tool that talks to customers via multiple channels. For instance WhatsApp, Facebook Messenger, and Telegram. Chatbots help people to work productively and efficiently. They can also help you to increase your conversion rate and generate leads.
Integrate a chat into your website
Now that you are - hopefully - excited about adding a chat to your website, it is time to help you get started. Trengo can help you add a chat to your website in five easy steps.
- Request the bot
- Configure the bot
- Train the bot
- Test the bot
- Celebrate your new team member
1. Request the chat
- Go to your Trengo admin account and create your first bot by clicking on the green plus sign.
- The next step is to give your bot an internal title and select the main language. Make sure the title is clear, in case you would like to add more bots in the future.
- Select the most relevant channels for your business. In this case, we will go for the website chat. If you have already requested this channel within Trengo, you can simply select it here. Otherwise, you will have to set up a website chat channel first.
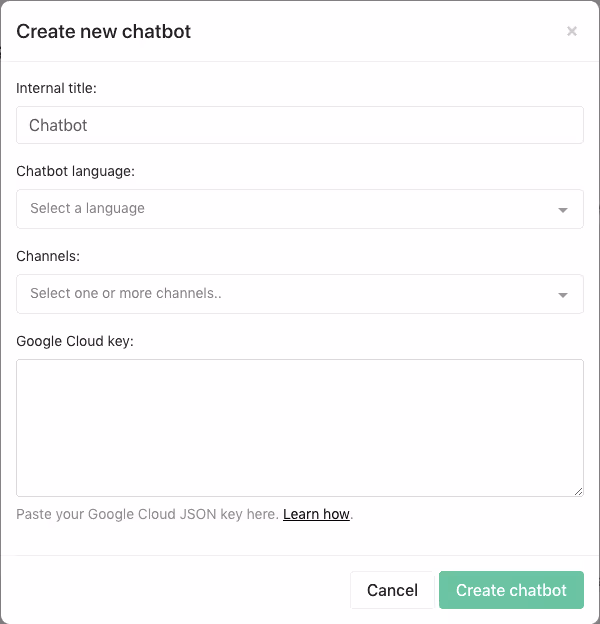
- To connect the bot to the machine learning technique from Google, you have to request the bot client access from Google Dialogflow. Within Trengo, you get a step by step explanation on how to complete this process.
2. Configure the bot
You have just created your first bot. Congrats! 🤖 Now it is time to personalize it. The following settings are divided into ‘Content’ and ‘Advanced options’.
Content
For starters, you can name your bot. I give you the tip to make this name playful and recognizable. Within these settings, you can also personalize the introduction text and fallback text.
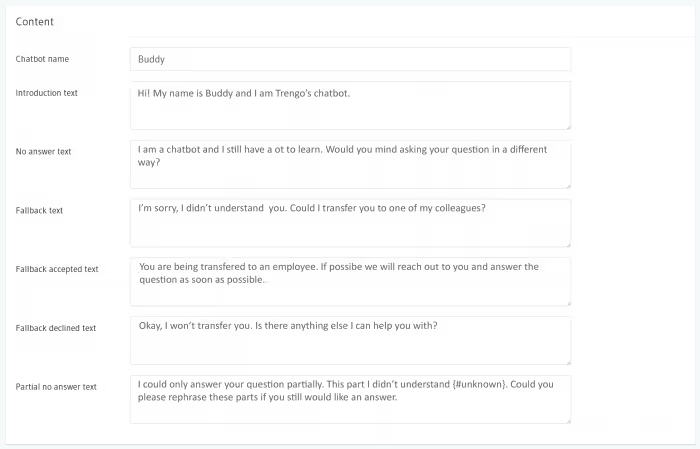
We have already provided you with the basics and filled in these scenarios. If you would like to customise your bot, feel free to write out your own.
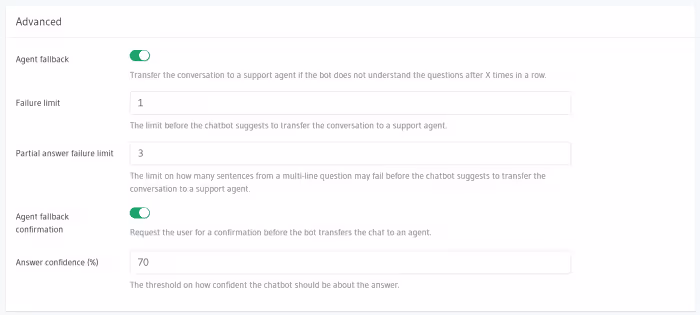
Advanced options
You can completely personalise your bot to your wishes. Trengo offers the following options:
- Agent fallback: If your bot cannot answer a question, it will forward the conversation to the service team.
- Failure limit: The bot keeps track of how often it does not know the answer to a question. If the failure limit is low, the chatbot will refer a question to the team more quickly.
- Partial answer failure limit: The bot can respond to more complex questions by returns what it understands in the conversation.
- Agent fallback confirmation: The bot asks the visitor if the conversation may be referred to an employee.
- Answer confidence: The higher the answer confidence percentage, the more certain the bot is about its answer to a question.
3. Train the bot
It is time to provide your bot with information about your company.
- Let’s start with creating categories. You can add categories such as General, Customer Service, and Sales. This gives you a clear overview of all the questions and answers your bot knows.

- Now you can add different questions and answers to your categories. Fill in several questions that match the same answer. This way the bot knows how to answer your visitors, even if a question is asked differently.
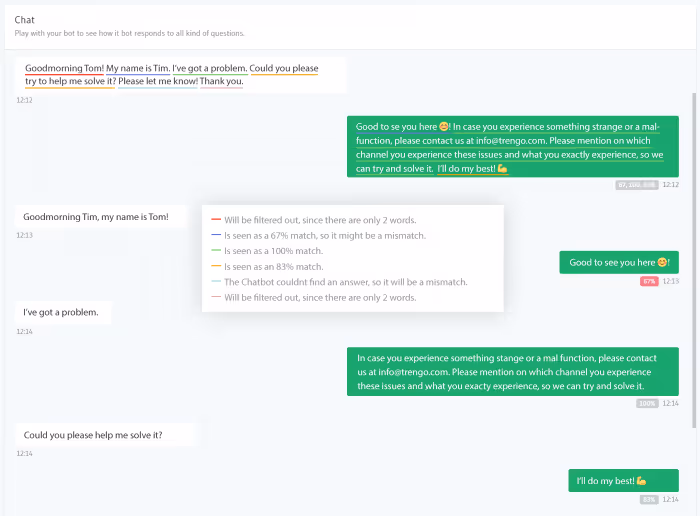
I advise you to add five different questions in the 'Question' field. I have made an example below that will show you how to implement this advice.

4. Test the bot
We have developed the Trengo Playground, in which you can test your own bot.
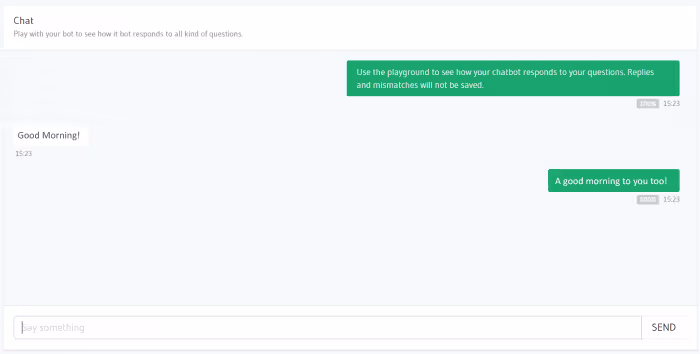
In the above case, the bot is 100% convinced that the question fits the answer. It is also possible that the matching percentage is shown in red. In the live environment, the bot will then say that he does not understand the question.
“I am a bot and I still have to learn a lot. Could you ask this question in a different way?”
The playground also gives you insight into how the bot handles complex questions. In the example below, we explain how the playground deals with this situation.
5. Celebrate your new team member
The time has come to celebrate your new team member and add the bot to your website. All you have to do is switch on the green button, save the changes and you are good to go 🚀

Frequently Asked Questions (FAQs)
What’s the easiest way to integrate a chat widget without coding?
The easiest way to add a chat widget to your website is by using a no-code solution that provides a simple copy-and-paste script. Most live chat providers, including Trengo, generate a widget code that you can paste into your website’s HTML, typically just before the closing </body> tag. Website builders like WordPress, Shopify, and Wix offer plugins or embed options so you can install live chat without touching any code. Once installed, your chat window will appear instantly, allowing you to engage with visitors in real time.
Which chat tools are best for small business websites?
Top live chat tools for small businesses include Trengo, JivoChat, Tidio, Crisp, and Smartsupp. These platforms offer user-friendly interfaces, automation features, and omnichannel support. Trengo stands out for its ability to centralise customer messages from your website, WhatsApp, Facebook, and more, making it easy for small teams to manage all conversations in one place.
Do I need a developer to install a chat widget on my website?
No, you do not need a developer. Most live chat solutions, including Trengo, provide straightforward installation guides and plugins for popular platforms like WordPress and Shopify. You can simply copy the provided script and paste it into your site’s HTML or use a plugin to get started in minutes.
How do I set up automated replies or bots in my website chat?
You can set up automated replies and chatbots using your chat provider’s dashboard. Platforms like Trengo allow you to create chatbot flows, set up FAQs, and configure triggers for instant responses to common questions. This automation ensures customers receive immediate help, even when your team is offline.
Can I install chat on WordPress, Shopify, or Wix websites?
Yes, installing live chat on WordPress, Shopify, or Wix is simple. Use the official plugin or app from your chat provider, or paste the chat widget script into your site’s settings or HTML. Trengo and other leading platforms offer dedicated plugins and clear instructions for these website builders.
What are the benefits of using live chat on a business website?
Live chat increases conversions, reduces response times, and improves customer satisfaction by offering real-time support. It helps build trust, keeps visitors engaged, and allows you to proactively assist users before they leave your site. With automation and analytics from platforms like Trengo, you can boost sales, collect valuable insights, and deliver a seamless customer experience.


Let's meet
Grow your business with loyalty. Bring all of your customer contact into one, single platform to unlock delight at every step of the way.


© 2026 Trengo